Sunday, November 28, 2010

Studio Dreaming

 It's getting closer!  All the drywall is up in the new studio and once the drywall inspection is done next Wed., we can start the final slog through taping and mudding and painting and all the other myriad of stuff that needs to be done to finish this project. 


 I've had a basic floor plan for all the furnishings and storage stuff for a long time but this weekend I pulled it out again and spent way too much some time rethinking everything.  I moved a few things around in the sewing area so I can make room for a bigger ironing area and more shelves for fabric and drew some elevation drawings so I could see where I could find room for small storage on the walls.   There are still a few areas that need some rethinking but I'm getting close.  Now I can think about the making it pretty part.  :)

 Ive been having a lot of fun this weekend checking out blogs showing all kinds of sewing and craft studios.  Tons of great inspiration out there!  I thought I'd share a few of my favorites.

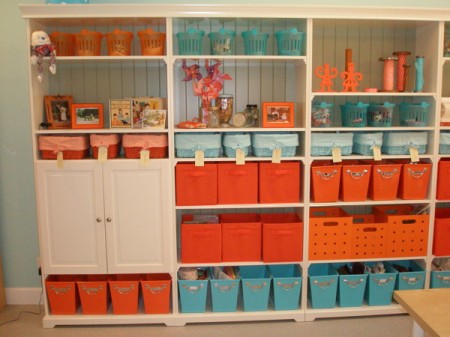
Anna Lena's studio
library-2421
Love the colors and all the neat organization here!  She must have read my mind because these are the colors I'm wanting to use for my new studio.  Are you cringing at the orange, Y?                              our-studio-03
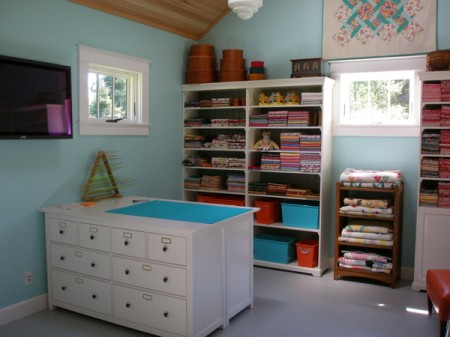
I really love this cutting table!  Look at all the storage!  Drool, drool, drool...  For more pics, click here.

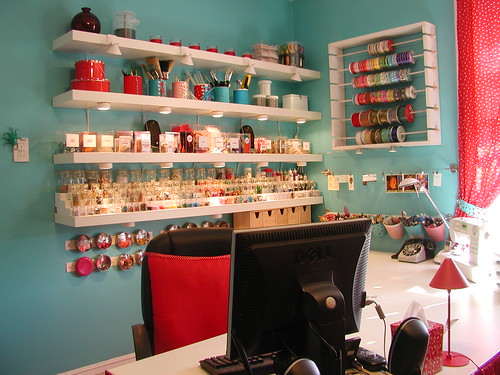
Crafty Intentions studio                Desk Surface by Crafty Intentions
Absolutely love the colors in this studio.  In fact, it inspired me to make the curtains and chair cover that I did for the studio before we tore it down.  And I love the wall with all the glass bottles for storing cool stuff.  Also, you can't see it well in this picture, but click here to see a closer picture of the cool tin can corsets and to see lots more pics of this great studio.

Allsorts studio
   Hutch3
Another really wonderful studio.  for more, click here.

Modkidboutique studio                   studio5
Isn't it fab?  So colorful and neat!  And I love the cutting table.  It's made from two Ikea shelves tipped on their sides.  Very tempting to make one for my studio!  For more, click here.

I can't decide if these studios inspire me or discourage me.  I think it's a bit of both.  :)  I know that my studio will never be as pretty as the ones above because...well, I'm too messy and some of the stuff I have to store would be impossible to make pretty.  But, I still plan to try and make my space as pretty as I can...Ikea here I come.    

Friday, November 26, 2010

Turning a Vintage Suitcase into a Camera Case

 I had such great plans for blogging this last week...and then we had snow, record cold and an almost 3 day power outage.  We got our power back Wednesday afternoon--just in time for frantic catch-up cleaning to get the house ready for having family over for Thanksgiving.  Oh well, company's gone now and I have some time to dink so maybe I can catch up on what I wanted to blog about. 

First up is a sort of tutorial on the camera case I made for my friend's birthday.  She's a photographer and vintage camera collector and I wanted to make her a fun camera case so she could take more of her cameras with her when she goes out to take photos.  Of course, since she loves vintage stuff, I had to find a vintage suitcase to start with.  I scored at a local junktique store and found a great Samsonite make-up case.  Then I found some cool vintage-looking fabric at a quilt shop and bought a cheap walmart sleeping pad to use for the padding. 
  
The raw materials
The first step was to make padding for the top, bottom and sides of the case.  I measured the dimensions of the top and bottom and measured the inside perimeter of the sides of the case and cut rectangles out of the sleeping pad to match those dimensions. 


Then I cut out fabric to cover the padding.  The fabric was cut to twice the dimension of the short leg of each rectangle plus 1 1/2" (1/2" seam allowance on each side and 1/2" of extra ease for the thickness of the padding) and the length of the long leg of each rectangle plus about 2" (1/2" seam allowance on each end plus some extra for ease and "just in case").  As an example, the bottom padding was cut to 6" x 12"  so I cut a piece of fabric 13 1/2" (6" x 2 plus 1 1/2") x 14" (12" plus 2"). 

On the long piece for wrapping around the sides of the case,  I sewed on strips of velcro before sewing it together so that I could later attach padded dividers.  Normally I would have sewn the velcro all the way around but I was short of velcro and didn't want to make yet another trip into town, so I just sewed enough on to cover the long sides of the case.


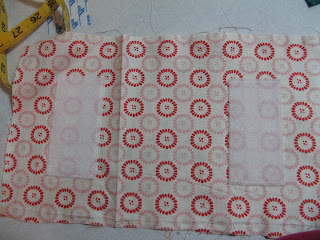
Once that was done, I folded the fabric rectangles right sides together, and sewed them, leaving one short end open so I could insert the padding. After turning the fabric right side out, I slid the padding inside the fabric covers and folded the raw edges of the open ends under and hand stitched them closed. 

Here's what it looked like after covering the padding with fabric.

After putting the padding in place, I decided that I wanted to add a pocket and some elastic to the top pad to hold small cameras and film. That meant figuring out a way to attach the top padding to the suitcase that would be strong enough to hold the weight of a few plastic cameras and film.  Back to the drawing board...I eventually ended up ripping apart the top fabric covering and adding industrial strength velcro to the back of it.
  

Then I added a pleated pocket with flap and a fabric covered strip of elastic to the front of the fabric cover before sewing it back up and putting the padding back in.

The case with the redesigned top padding in place.

Once all the padding of the case was done, I measured the inside dimensions of the case (with the padding in place) so I could make some padded dividers.  Since the velcro was only on the long sides of the case, the dividers were made to span from one long side to the other.  I made the dividers tall enough to  come to the top of the uppermost strip of velcro so that the dividers could be oriented either vertically or horizontally.  The process of covering the padding was pretty much the same as for the earlier padding except that I left about 2 inches of extra fabric on the short ends of the dividers  so I could sew a strip of velcro on each end.  My velcro strips were about 1/2" wide so I trimmed the ends so that I had enough fabric to made a double 1/2" fold plus a little extra.  Once I did that, I layed the strip of velcro on top of the folded edge and sewed it on with a zipper foot.  To make is really secure, I sewed around all 4 edges of the velcro.

divider

Once the padded dividers were sewn, I decided that the camera case was fffffinished.  I think it turned out pretty well and I can't wait to make something similar for myself.  :)


Since this is my first attempt at any sort of tutorial, let me know how I did!  Were my explanations understandable or just confusing?  I'd like to do more tutorials in the future so I want to make sure I'm doing a good job of making everything clear and easy to follow.  :) 

Wednesday, November 10, 2010

Fort Worden...or What I Did Last Weekend

Every year in early November, I usually go up with some of the ladies in my knitting group for a knitting retreat at Fort Worden State Park.  It's a time to get away from everyday life for a while and just spend the weekend knitting and relaxing.  Of course I wanted to take my spinning wheel up with me and I was determined to dig out something new to spin, so that meant I had to get off my butt get busy and finish what I had on the wheel and ply it.

I had some wool pencil roving that I'd had on my wheel for...well, let's just say it was on there a lot longer than it should have been and leave it at that.  Anyway, I finished spinning the last bobbin and then took the three bobbins I had and plyed them together to make a worsted weight yarn.  Whoo hoo for finished projects!  Now I just have to figure out what to make with it.  :)


The night before I left, I went totally insane spent a lot of time deciding what to bring with me.  Way too many things I want to do, not enough time to do them and way, way too much mindf***ing overthinking them.  Good thing I only had to choose from the fiber and yarn I left unpacked during the studio remodel.  Otherwise my brain might have spontaneously exploded.   

I finally did make my choices and brought just a few things to work on. It was a pretty productive weekend for me--I didn't have to frog anything, I finished 2 of the 4 projects I brought to work on, started a 3rd, and kept my sanity (well, that's debatable) despite being sick with a cold and suffering from a severe lack of sleep.

I got a full bobbin of lace weight singles spun from some yarn I dyed with Wilton food coloring a few years ago.  The hat is from yarn I bought last year after retreat, and the green is yarn I've had lying around for a looooooonnnnng time that's finally being slowly turned into a lovely warm cowl that I can put on my neck or around my shoulders this winter when I get cold.  Maybe I should say hopefully this winter.  As you've probably figured out, I'm a little slow to get things finished.  :)

Of course, the whole weekend wasn't spent just knitting and spinning.  Friday was spent shopping at fun shops in Sequim and Port Townsend.  I didn't spend that much on knitting and spinning stuff but I did indulge in some french-milled soaps and lotion and a new cookbook.  Can't wait to try some of the recipes out on my besties!
Yum!

I did have to buy this sock yarn.  Earlier this fall, I went to the Oregon Flock and Fiber Festival and bought the bright, happy spinning fiber at the back of this photo so when I found sock yarn to match, well...how could I resist?


Tuesday, November 2, 2010

Studio Update

Wow, once again, it's been awhile since I've blogged.  I've been busy trying to get some clothes sewn for myself so that's been occupying all the brain cells I have left.   I've resisted blogging about that whole process because...well, for a lot of reasons, one of which would be that it just might be the most boring thing anyone has ever read.  :)

The progress in the studio has been slow and steady.  Al has been out there as much as he can, working on the electrical.  It's been a bit more of a challenge than we thought because in order to finish up the wiring at the panel, he had to test every outlet and light in the house and re-label everything because very few of the original labels in the electrical panel were right.  I think he's really close though and hopefully can call for the electrical inspection and the framing inspection this week or next.  Then we can start insulating!!! 

The outside is all done and beautiful.  Here are the pics I took of it on one of the last sunny days we had.


I have to admit I'm getting pretty antsy to get my studio back.  It's been almost 6 months now and I can't tell you how many times I've wanted to look something up in one of my sewing books (I keep having to check out books I own from the library because I can't get to mine) or fix a piece of jewelry or buy a something like zippers or velcro from Joann's because the ones I have are packed.  And then there's the whole "sewing at the dining room table and cutting stuff out on the kitchen counter" which works in theory but not so well in practice--especially when 3 other people need the table space for their work and the counter is the only counter in the kitchen that is useable space for cooking.  :)  I really sound whiney, don't I?  :) 

That's not my intent, really!  It's been pretty funny most of the time watching how this "hormone-driven mid-life person I don't recognize anymore" called me trys to deal with two of her biggest stressors--lack of organization and lack of space.  Maybe my son could make a movie out of it.  :)