Showing posts with label gifts. Show all posts

Friday, November 26, 2010

Turning a Vintage Suitcase into a Camera Case

 I had such great plans for blogging this last week...and then we had snow, record cold and an almost 3 day power outage.  We got our power back Wednesday afternoon--just in time for frantic catch-up cleaning to get the house ready for having family over for Thanksgiving.  Oh well, company's gone now and I have some time to dink so maybe I can catch up on what I wanted to blog about. 

First up is a sort of tutorial on the camera case I made for my friend's birthday.  She's a photographer and vintage camera collector and I wanted to make her a fun camera case so she could take more of her cameras with her when she goes out to take photos.  Of course, since she loves vintage stuff, I had to find a vintage suitcase to start with.  I scored at a local junktique store and found a great Samsonite make-up case.  Then I found some cool vintage-looking fabric at a quilt shop and bought a cheap walmart sleeping pad to use for the padding. 
  
The raw materials
The first step was to make padding for the top, bottom and sides of the case.  I measured the dimensions of the top and bottom and measured the inside perimeter of the sides of the case and cut rectangles out of the sleeping pad to match those dimensions. 


Then I cut out fabric to cover the padding.  The fabric was cut to twice the dimension of the short leg of each rectangle plus 1 1/2" (1/2" seam allowance on each side and 1/2" of extra ease for the thickness of the padding) and the length of the long leg of each rectangle plus about 2" (1/2" seam allowance on each end plus some extra for ease and "just in case").  As an example, the bottom padding was cut to 6" x 12"  so I cut a piece of fabric 13 1/2" (6" x 2 plus 1 1/2") x 14" (12" plus 2"). 

On the long piece for wrapping around the sides of the case,  I sewed on strips of velcro before sewing it together so that I could later attach padded dividers.  Normally I would have sewn the velcro all the way around but I was short of velcro and didn't want to make yet another trip into town, so I just sewed enough on to cover the long sides of the case.


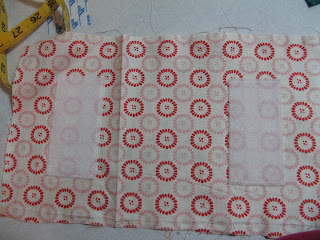
Once that was done, I folded the fabric rectangles right sides together, and sewed them, leaving one short end open so I could insert the padding. After turning the fabric right side out, I slid the padding inside the fabric covers and folded the raw edges of the open ends under and hand stitched them closed. 

Here's what it looked like after covering the padding with fabric.

After putting the padding in place, I decided that I wanted to add a pocket and some elastic to the top pad to hold small cameras and film. That meant figuring out a way to attach the top padding to the suitcase that would be strong enough to hold the weight of a few plastic cameras and film.  Back to the drawing board...I eventually ended up ripping apart the top fabric covering and adding industrial strength velcro to the back of it.
  

Then I added a pleated pocket with flap and a fabric covered strip of elastic to the front of the fabric cover before sewing it back up and putting the padding back in.

The case with the redesigned top padding in place.

Once all the padding of the case was done, I measured the inside dimensions of the case (with the padding in place) so I could make some padded dividers.  Since the velcro was only on the long sides of the case, the dividers were made to span from one long side to the other.  I made the dividers tall enough to  come to the top of the uppermost strip of velcro so that the dividers could be oriented either vertically or horizontally.  The process of covering the padding was pretty much the same as for the earlier padding except that I left about 2 inches of extra fabric on the short ends of the dividers  so I could sew a strip of velcro on each end.  My velcro strips were about 1/2" wide so I trimmed the ends so that I had enough fabric to made a double 1/2" fold plus a little extra.  Once I did that, I layed the strip of velcro on top of the folded edge and sewed it on with a zipper foot.  To make is really secure, I sewed around all 4 edges of the velcro.

divider

Once the padded dividers were sewn, I decided that the camera case was fffffinished.  I think it turned out pretty well and I can't wait to make something similar for myself.  :)


Since this is my first attempt at any sort of tutorial, let me know how I did!  Were my explanations understandable or just confusing?  I'd like to do more tutorials in the future so I want to make sure I'm doing a good job of making everything clear and easy to follow.  :) 

Saturday, July 3, 2010

Miniature Garden Birthday Fun

Yesterday was one of my bff's birthday and her gift theme this year was garden stuff.  She's become intrigued with miniature gardens, so I decided that I would make her one for her gift.  I'm not sure what "mentally challenged" part of my brain was involved in that decision because life has been just a bit busy lately but regardless, I bought plants at a nursery in Chehalis and found some cool stuff at the thrift shop in town and set to work Thursday night creating. 

I have to say that it was one of the funnest things I've done in a long time and I'm gonna have a really hard time not making a lot more of them.  They're seriously addicting.  


Making these reminds me of when I was a kid.  We spent a lot of weekends in the summer camping at Fish Creek Campground in Glacier Park and I would always find a tree at the edge of our campsite, hollow out a spot between two tree roots and collect rocks and twigs and bark and make tiny gardens with bark huts and twig fences.  Until I made this garden the other night, I'd forgotten how much I loved making those gardens.

I see at least a few more of these creations in my future.  :)

Monday, June 21, 2010

Happy Birthday Giggle!

Today is my sister Gayle's birthday.  In honor of that I decided I'd post some pics of the mini quilt I'm working on for her last year's birthday.  So like me to be a year behind, huh?  :)  


I think I'm about finished adding flowers so now I have to add the beading for the centers.  I did a few centers on the small flowers last night but I don't like them so I'm going to have to cut the beads off and start over.  I think I might have to buy some different beads to get the look I want.  When the beading is all done, I have to decide if I'm going to add a border to the quilt.  I think I want to machine quilt the words of the song that was the inspiration for this quilt on a border but it's something that I'm going to have to think about for a while. 

Wednesday, January 27, 2010

Grumpy Quilter

Well, I finally got Al's quilt machine quilted!  I started by making the back on Monday.  I used almost all the extra scraps I had left from piecing the top so that made me really happy--no scraps to have to put back into my fabric drawers.  :)  Add to that a couple of other fun fabrics I found and I had a really cute quilt back.


I decided to spray baste it instead of pinning it because I didn't want to work that hard, which was fine except I ran out of spray adhesive when I was almost done so I had to get out of my pajamas and go into town to get some more spray.  So much for trying to be lazy, huh?


So close and yet so far.  :)

Once I got everything sandwiched and rolled up I set it aside until today when I knew I'd have a little bit of time to get some quilting done. I wanted to figure out a cooler quilting pattern than stipple stitch so I spent some time this morning drawing out some ideas on scratch paper. I thought I had a really cool pattern but when I finished my first row of quilting, it looked really bad so I spent about 45 minutes ripping  it out.  A quick trip back to the drawing pad and I had another idea for a quilt pattern and I got back to the sewing machine to get the thing quilted.
All I have to say about that is I need a different set-up if I'm gonna quilt bigger quilts.  I even moved my machine to the dining room table and it was a miserable experience.  My shoulders are still burning and the quilting isn't very pretty.  I think the worst part is that I really enjoy the whole process of machine quilting when I quilt small quilts and getting so frustrated today with something I normally love has made me twice as grumpy.  It probably didn't help that the thread gremlins were on overtime today and I kept either breaking the top thread or having the bobbin thread run out at just the wrong time.  But...it's finished and that's what counts the most.  


It's a little hard to see the quilting pattern but it's a combination of straight lines and leaves.

Tomorrow when I get home from band I'll work on getting the binding machine stitched on and then I'll pack it up to take to the beach next week to do the hand sewing part.  And then I can give it to my sweetie so he can use it before it gets warm.  The very thought of it finished is enough to make me un-grumpy!  Well, that and hot chocolate and a book tonight. :)


Monday, December 21, 2009

Merry Christmas Yayas

"The things we do for love."
-10cc song

This first post is for my yas, one of whom (I won't name names, Cindy) has been gently hinting and nagging nudging me to start a blog.  I have to be honest and say it's been kind of fun so far.  I'm still not sure how well I'll do keeping up with it but I guess since it's my blog I get to pick how often I post.  :)

I've been working on a few projects for Christmas and December birthdays and I just realized that I wrapped most of them  without taking pictures of them.  Silly Girl!  Good thing I made them easy to open--all under the guise of "artistic" wrapping too! 

Table runner  and placemats 


Paris Journal with souvenir envelope pasted on the inside of the back cover


Fun candles made from wine glasses and a teacup


Stitch markers


I've also been working on a lap quilt for my sweetie for Christmas.  Kinda stupid to start it 10 days before Christmas gets here, huh? Especially since he is on vacation now and is around the house all the time.  I've had to work on it when he goes to sleep because the studio has glass doors into the dining room and is also where you walk through to get to the garage so there's no way to hide what I'm doing.  Definitely not conducive to making much progress.  :) Oh well, I'll just get as much done as possible before Christmas and wrap what I have.  I'm using a disappearing nine patch block from a tutorial I found here.  http://quiltsatcs.blogspot.com/2007/04/disappearing-9-patch-tutorial.html

I have a lot of small pieces of fabric and thought this block might be a good way to use some of them (although not nearly enough of them) and I like how complex the final quilt looks.  I finished sewing and squaring up the nine patch blocks today.  Now to cut them in fourths and rearrange!  I think that will be the fun part--well, minus the having to hide

One of the finished nine patch blocks.


   And here is a block all cut up

I really love how this looks!

Well, that's it for my first post!  I'm tired tonight and am going to take a break and read for awhile instead of cutting more blocks.

Hugs yas!