I had such great plans for blogging this last week...and then we had snow, record cold and an almost 3 day power outage. We got our power back Wednesday afternoon--just in time for frantic catch-up cleaning to get the house ready for having family over for Thanksgiving. Oh well, company's gone now and I have some time to dink so maybe I can catch up on what I wanted to blog about.
First up is a sort of tutorial on the camera case I made for my friend's birthday. She's a photographer and vintage camera collector and I wanted to make her a fun camera case so she could take more of her cameras with her when she goes out to take photos. Of course, since she loves vintage stuff, I had to find a vintage suitcase to start with. I scored at a local junktique store and found a great Samsonite make-up case. Then I found some cool vintage-looking fabric at a quilt shop and bought a cheap walmart sleeping pad to use for the padding.
The raw materials
The first step was to make padding for the top, bottom and sides of the case. I measured the dimensions of the top and bottom and measured the inside perimeter of the sides of the case and cut rectangles out of the sleeping pad to match those dimensions.
Then I cut out fabric to cover the padding. The fabric was cut to twice the dimension of the short leg of each rectangle plus 1 1/2" (1/2" seam allowance on each side and 1/2" of extra ease for the thickness of the padding) and the length of the long leg of each rectangle plus about 2" (1/2" seam allowance on each end plus some extra for ease and "just in case"). As an example, the bottom padding was cut to 6" x 12" so I cut a piece of fabric 13 1/2" (6" x 2 plus 1 1/2") x 14" (12" plus 2").
On the long piece for wrapping around the sides of the case, I sewed on strips of velcro before sewing it together so that I could later attach padded dividers. Normally I would have sewn the velcro all the way around but I was short of velcro and didn't want to make yet another trip into town, so I just sewed enough on to cover the long sides of the case.
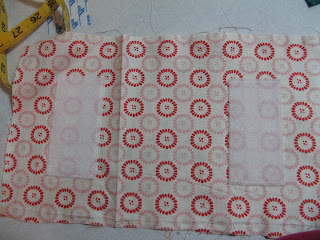
Once that was done, I folded the fabric rectangles right sides together, and sewed them, leaving one short end open so I could insert the padding. After turning the fabric right side out, I slid the padding inside the fabric covers and folded the raw edges of the open ends under and hand stitched them closed.
Here's what it looked like after covering the padding with fabric.
After putting the padding in place, I decided that I wanted to add a pocket and some elastic to the top pad to hold small cameras and film. That meant figuring out a way to attach the top padding to the suitcase that would be strong enough to hold the weight of a few plastic cameras and film. Back to the drawing board...I eventually ended up ripping apart the top fabric covering and adding industrial strength velcro to the back of it.
Then I added a pleated pocket with flap and a fabric covered strip of elastic to the front of the fabric cover before sewing it back up and putting the padding back in.
The case with the redesigned top padding in place.
Once all the padding of the case was done, I measured the inside dimensions of the case (with the padding in place) so I could make some padded dividers. Since the velcro was only on the long sides of the case, the dividers were made to span from one long side to the other. I made the dividers tall enough to come to the top of the uppermost strip of velcro so that the dividers could be oriented either vertically or horizontally. The process of covering the padding was pretty much the same as for the earlier padding except that I left about 2 inches of extra fabric on the short ends of the dividers so I could sew a strip of velcro on each end. My velcro strips were about 1/2" wide so I trimmed the ends so that I had enough fabric to made a double 1/2" fold plus a little extra. Once I did that, I layed the strip of velcro on top of the folded edge and sewed it on with a zipper foot. To make is really secure, I sewed around all 4 edges of the velcro.
divider
Once the padded dividers were sewn, I decided that the camera case was fffffinished. I think it turned out pretty well and I can't wait to make something similar for myself. :)
Since this is my first attempt at any sort of tutorial, let me know how I did! Were my explanations understandable or just confusing? I'd like to do more tutorials in the future so I want to make sure I'm doing a good job of making everything clear and easy to follow. :)


