Monday, December 27, 2010

Digital Xpro fun

I had a ton of fun playing around in Photoshop tonight.  I wanted to post some Christmas photos on Facebook but I didn't really like how a lot of them looked so I decided to try some digital collage and cross processing to see if I could make them more interesting.  Here are a few of my favorites.


I think they really look very vintage and analog, don't you?  The picture of the tree branch was cross processed and then layered with a transparent background to give it extra texture and interest.  I even learned how to create an interesting border around the photos, although I'd like to find a frame that simulates the border you'd get when you do a polaroid transfer.  It looks a lot messier and grungier, which is what I like.  :)

Wednesday, December 22, 2010

A Very Melissa Lace Project

Last week, on my birthday, I decided to get my bod out of the house and go do something fun.  So I headed up to Silverdale (which some might consider idiotic instead of fun since it's so close to Christmas time) to dink around doing some shopping.  My first stop was at the local knitting shop where I ran across this book.
I fell in love.  The whole concept behind the book is freeform lace knitting.  The author gives several basic shapes usually used when knitting shawls (i.e. triangle, square, rectangle, circle) and shows the pattern for creating that shape and then gives ideas for knitting the fill-in lace without slavishly following a pattern.  What you do with the lace is entirely up to you.  You can take various lace stitch patterns and place them where you want or you can totally wing it and just put yarn-overs and decreases where you want.  The only "rules" are to pair each yarn-over with a decrease and, if you're doing a shape like a triangle that has symmetrical shaping on each side of the center, to count the stitches on each side of center every few rows to make sure they stay symmetrical.  Sounds like my kind of lace knitting!  So, since I had some lace weight merino and mohair yarn that I'd just finished ripping out from another project, I just had to try my hand at making random lace. 

 
It's hard to really see the lace "design" because it's not blocked but I love the process of knitting it!  No making mistakes and having to rip out rows and rows of knitting.  No having to stop every few minutes to find your place on the pattern chart.  It's definitely not a technique that everyone will love--the gals at my knitting group were all looking at me like I was nuts when I showed them last night--but it's definitely the right fit for my personality.  :)

Sunday, November 28, 2010

Studio Dreaming

 It's getting closer!  All the drywall is up in the new studio and once the drywall inspection is done next Wed., we can start the final slog through taping and mudding and painting and all the other myriad of stuff that needs to be done to finish this project. 


 I've had a basic floor plan for all the furnishings and storage stuff for a long time but this weekend I pulled it out again and spent way too much some time rethinking everything.  I moved a few things around in the sewing area so I can make room for a bigger ironing area and more shelves for fabric and drew some elevation drawings so I could see where I could find room for small storage on the walls.   There are still a few areas that need some rethinking but I'm getting close.  Now I can think about the making it pretty part.  :)

 Ive been having a lot of fun this weekend checking out blogs showing all kinds of sewing and craft studios.  Tons of great inspiration out there!  I thought I'd share a few of my favorites.

Anna Lena's studio
library-2421
Love the colors and all the neat organization here!  She must have read my mind because these are the colors I'm wanting to use for my new studio.  Are you cringing at the orange, Y?                              our-studio-03
I really love this cutting table!  Look at all the storage!  Drool, drool, drool...  For more pics, click here.

Crafty Intentions studio                Desk Surface by Crafty Intentions
Absolutely love the colors in this studio.  In fact, it inspired me to make the curtains and chair cover that I did for the studio before we tore it down.  And I love the wall with all the glass bottles for storing cool stuff.  Also, you can't see it well in this picture, but click here to see a closer picture of the cool tin can corsets and to see lots more pics of this great studio.

Allsorts studio
   Hutch3
Another really wonderful studio.  for more, click here.

Modkidboutique studio                   studio5
Isn't it fab?  So colorful and neat!  And I love the cutting table.  It's made from two Ikea shelves tipped on their sides.  Very tempting to make one for my studio!  For more, click here.

I can't decide if these studios inspire me or discourage me.  I think it's a bit of both.  :)  I know that my studio will never be as pretty as the ones above because...well, I'm too messy and some of the stuff I have to store would be impossible to make pretty.  But, I still plan to try and make my space as pretty as I can...Ikea here I come.    

Friday, November 26, 2010

Turning a Vintage Suitcase into a Camera Case

 I had such great plans for blogging this last week...and then we had snow, record cold and an almost 3 day power outage.  We got our power back Wednesday afternoon--just in time for frantic catch-up cleaning to get the house ready for having family over for Thanksgiving.  Oh well, company's gone now and I have some time to dink so maybe I can catch up on what I wanted to blog about. 

First up is a sort of tutorial on the camera case I made for my friend's birthday.  She's a photographer and vintage camera collector and I wanted to make her a fun camera case so she could take more of her cameras with her when she goes out to take photos.  Of course, since she loves vintage stuff, I had to find a vintage suitcase to start with.  I scored at a local junktique store and found a great Samsonite make-up case.  Then I found some cool vintage-looking fabric at a quilt shop and bought a cheap walmart sleeping pad to use for the padding. 
  
The raw materials
The first step was to make padding for the top, bottom and sides of the case.  I measured the dimensions of the top and bottom and measured the inside perimeter of the sides of the case and cut rectangles out of the sleeping pad to match those dimensions. 


Then I cut out fabric to cover the padding.  The fabric was cut to twice the dimension of the short leg of each rectangle plus 1 1/2" (1/2" seam allowance on each side and 1/2" of extra ease for the thickness of the padding) and the length of the long leg of each rectangle plus about 2" (1/2" seam allowance on each end plus some extra for ease and "just in case").  As an example, the bottom padding was cut to 6" x 12"  so I cut a piece of fabric 13 1/2" (6" x 2 plus 1 1/2") x 14" (12" plus 2"). 

On the long piece for wrapping around the sides of the case,  I sewed on strips of velcro before sewing it together so that I could later attach padded dividers.  Normally I would have sewn the velcro all the way around but I was short of velcro and didn't want to make yet another trip into town, so I just sewed enough on to cover the long sides of the case.


Once that was done, I folded the fabric rectangles right sides together, and sewed them, leaving one short end open so I could insert the padding. After turning the fabric right side out, I slid the padding inside the fabric covers and folded the raw edges of the open ends under and hand stitched them closed. 

Here's what it looked like after covering the padding with fabric.

After putting the padding in place, I decided that I wanted to add a pocket and some elastic to the top pad to hold small cameras and film. That meant figuring out a way to attach the top padding to the suitcase that would be strong enough to hold the weight of a few plastic cameras and film.  Back to the drawing board...I eventually ended up ripping apart the top fabric covering and adding industrial strength velcro to the back of it.
  

Then I added a pleated pocket with flap and a fabric covered strip of elastic to the front of the fabric cover before sewing it back up and putting the padding back in.

The case with the redesigned top padding in place.

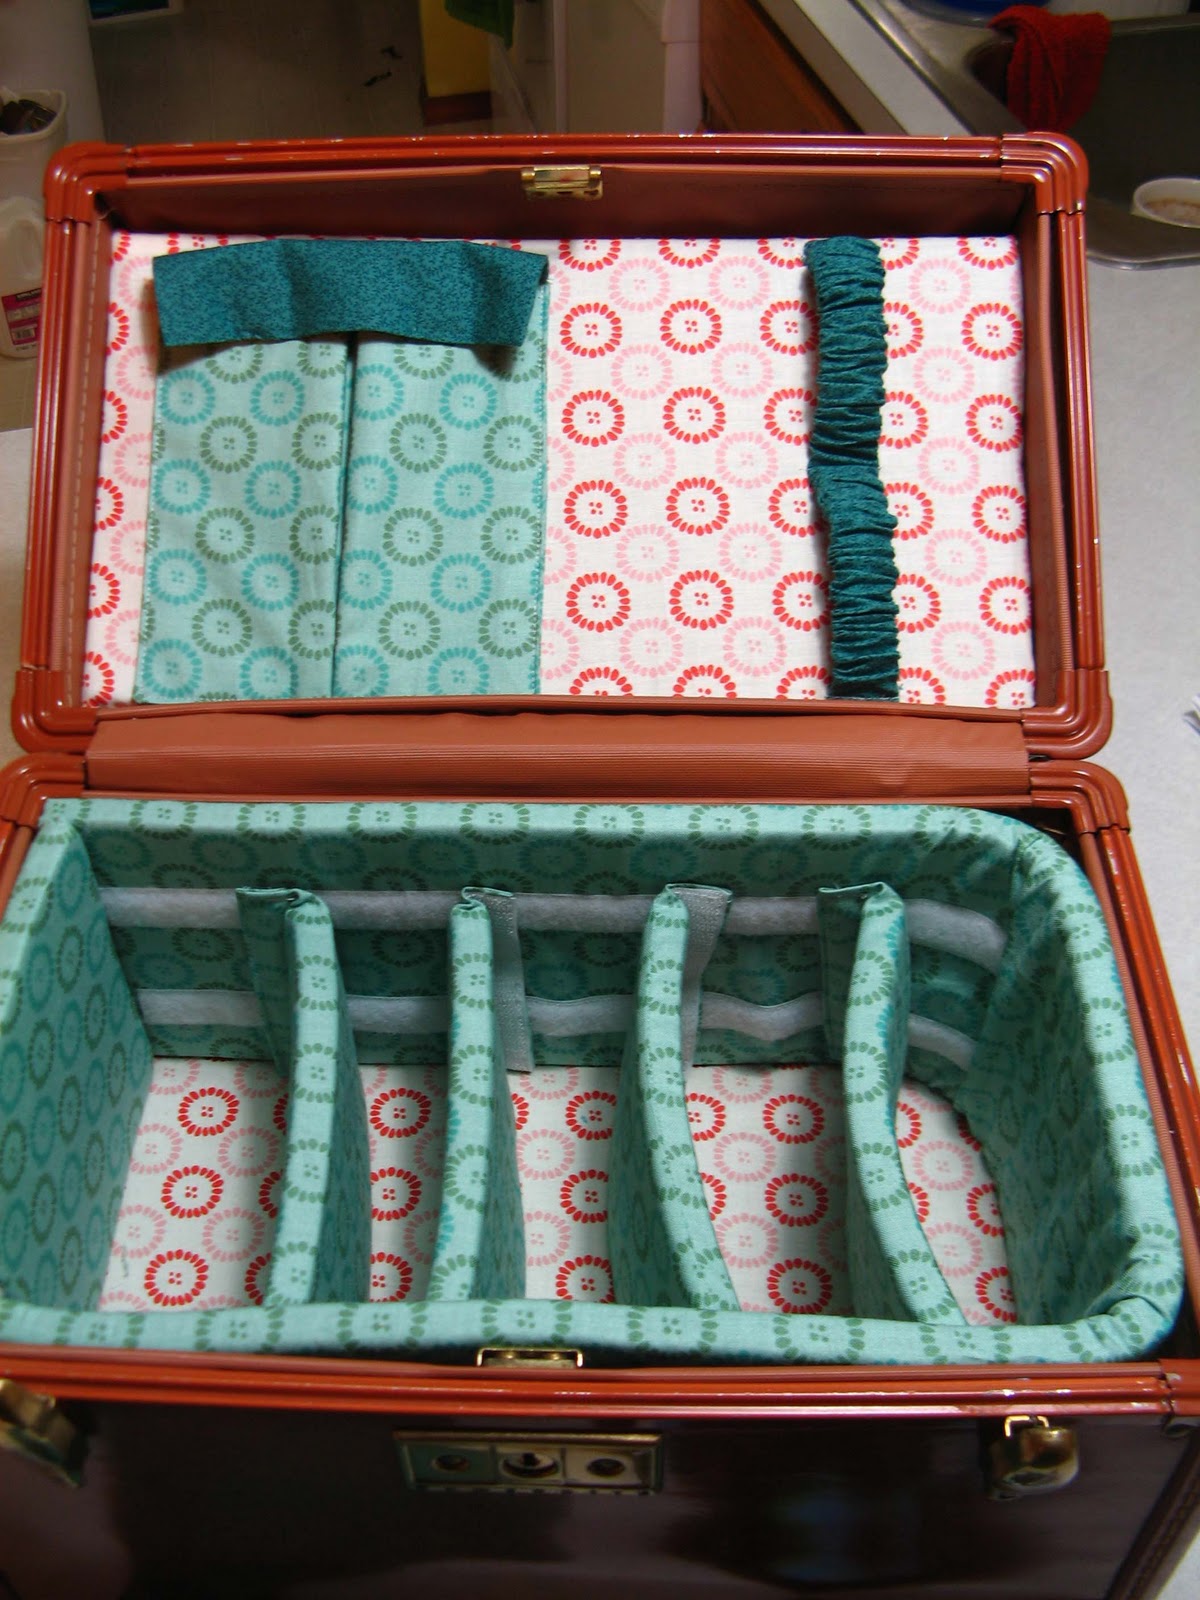
Once all the padding of the case was done, I measured the inside dimensions of the case (with the padding in place) so I could make some padded dividers.  Since the velcro was only on the long sides of the case, the dividers were made to span from one long side to the other.  I made the dividers tall enough to  come to the top of the uppermost strip of velcro so that the dividers could be oriented either vertically or horizontally.  The process of covering the padding was pretty much the same as for the earlier padding except that I left about 2 inches of extra fabric on the short ends of the dividers  so I could sew a strip of velcro on each end.  My velcro strips were about 1/2" wide so I trimmed the ends so that I had enough fabric to made a double 1/2" fold plus a little extra.  Once I did that, I layed the strip of velcro on top of the folded edge and sewed it on with a zipper foot.  To make is really secure, I sewed around all 4 edges of the velcro.

divider

Once the padded dividers were sewn, I decided that the camera case was fffffinished.  I think it turned out pretty well and I can't wait to make something similar for myself.  :)


Since this is my first attempt at any sort of tutorial, let me know how I did!  Were my explanations understandable or just confusing?  I'd like to do more tutorials in the future so I want to make sure I'm doing a good job of making everything clear and easy to follow.  :) 

Wednesday, November 10, 2010

Fort Worden...or What I Did Last Weekend

Every year in early November, I usually go up with some of the ladies in my knitting group for a knitting retreat at Fort Worden State Park.  It's a time to get away from everyday life for a while and just spend the weekend knitting and relaxing.  Of course I wanted to take my spinning wheel up with me and I was determined to dig out something new to spin, so that meant I had to get off my butt get busy and finish what I had on the wheel and ply it.

I had some wool pencil roving that I'd had on my wheel for...well, let's just say it was on there a lot longer than it should have been and leave it at that.  Anyway, I finished spinning the last bobbin and then took the three bobbins I had and plyed them together to make a worsted weight yarn.  Whoo hoo for finished projects!  Now I just have to figure out what to make with it.  :)


The night before I left, I went totally insane spent a lot of time deciding what to bring with me.  Way too many things I want to do, not enough time to do them and way, way too much mindf***ing overthinking them.  Good thing I only had to choose from the fiber and yarn I left unpacked during the studio remodel.  Otherwise my brain might have spontaneously exploded.   

I finally did make my choices and brought just a few things to work on. It was a pretty productive weekend for me--I didn't have to frog anything, I finished 2 of the 4 projects I brought to work on, started a 3rd, and kept my sanity (well, that's debatable) despite being sick with a cold and suffering from a severe lack of sleep.

I got a full bobbin of lace weight singles spun from some yarn I dyed with Wilton food coloring a few years ago.  The hat is from yarn I bought last year after retreat, and the green is yarn I've had lying around for a looooooonnnnng time that's finally being slowly turned into a lovely warm cowl that I can put on my neck or around my shoulders this winter when I get cold.  Maybe I should say hopefully this winter.  As you've probably figured out, I'm a little slow to get things finished.  :)

Of course, the whole weekend wasn't spent just knitting and spinning.  Friday was spent shopping at fun shops in Sequim and Port Townsend.  I didn't spend that much on knitting and spinning stuff but I did indulge in some french-milled soaps and lotion and a new cookbook.  Can't wait to try some of the recipes out on my besties!
Yum!

I did have to buy this sock yarn.  Earlier this fall, I went to the Oregon Flock and Fiber Festival and bought the bright, happy spinning fiber at the back of this photo so when I found sock yarn to match, well...how could I resist?


Tuesday, November 2, 2010

Studio Update

Wow, once again, it's been awhile since I've blogged.  I've been busy trying to get some clothes sewn for myself so that's been occupying all the brain cells I have left.   I've resisted blogging about that whole process because...well, for a lot of reasons, one of which would be that it just might be the most boring thing anyone has ever read.  :)

The progress in the studio has been slow and steady.  Al has been out there as much as he can, working on the electrical.  It's been a bit more of a challenge than we thought because in order to finish up the wiring at the panel, he had to test every outlet and light in the house and re-label everything because very few of the original labels in the electrical panel were right.  I think he's really close though and hopefully can call for the electrical inspection and the framing inspection this week or next.  Then we can start insulating!!! 

The outside is all done and beautiful.  Here are the pics I took of it on one of the last sunny days we had.


I have to admit I'm getting pretty antsy to get my studio back.  It's been almost 6 months now and I can't tell you how many times I've wanted to look something up in one of my sewing books (I keep having to check out books I own from the library because I can't get to mine) or fix a piece of jewelry or buy a something like zippers or velcro from Joann's because the ones I have are packed.  And then there's the whole "sewing at the dining room table and cutting stuff out on the kitchen counter" which works in theory but not so well in practice--especially when 3 other people need the table space for their work and the counter is the only counter in the kitchen that is useable space for cooking.  :)  I really sound whiney, don't I?  :) 

That's not my intent, really!  It's been pretty funny most of the time watching how this "hormone-driven mid-life person I don't recognize anymore" called me trys to deal with two of her biggest stressors--lack of organization and lack of space.  Maybe my son could make a movie out of it.  :)

Tuesday, October 12, 2010

Almost Famous

Last Friday night was a night to thrill any mom's heart.  After an awesome day spent with my bestest friends ever, I got to jump in the car and head down to Tacoma to watch my oldest son's film "The Match Girl" on the big screen.  The film was a selected film in this year's Tacoma Film Festival. 

Notice the ticket stub :)

It was such a fun evening.  The first thing that happened was that my daughter and I stood in line right behind the actress that played the grandmother.  I recognized her and introduced myself and we had a really nice conversation.  I even asked her for her autograph for a little "mom"erabilia.   

Then we noticed that my sister-in-law and brother-in-law were in line ahead of us (too far ahead to visit with but we at least waved).  And then my budding superstar filmmaker showed up with his friends and fellow filmmakers and I got a huge hug and an introduction to the executive producer of his film.  He was the one who believed enough in the film to shell out money for post production costs. 

After the film, one of  Alex's other filmmaker friends somehow recognised me as Alex's mom and came up and introduced himself to me.  That was fun.  :) 

I was hoping to post a pic I took of Alex and friends after the film but I took it on his phone and he didn't get it sent to me before he had to leave for Seattle for a paid shoot.  If I ever get the photo, I'll post it here--he looks good all spiffed up.  Black shirt, black pants, white tie, blond hair sticking straight up.  :)

Thursday, September 30, 2010

Leaf Love

Even though I've been a whiny girl about the rain this month, I'm glad to see Fall here.  I love when the leaves start to turn colors.  It makes me want to do a happy dance!  :)

I was driving home from errands today and the sun just happened to be shining and I happened to have my camera with me and I just happened upon a beautiful tree with leaves of orange and gold and as it happened, I took some photos.  :)


Beauty happens.

Wednesday, September 29, 2010

Studio Progress

Thought I'd better try to get a few pics up since it's been so long since I've posted anything.  :)  I now have a roof for my studio.  Yay!  It came with a bit of suffering for my sweetie though.  He smashed his finger really badly (I had to take him to urgent care where they stitched him up and put a splint on it) and then he had to keep working because the weatherman was predicting rain.  And man did it rain!  Not just the typical Northwest misty rain, but a freakin' deluge.  Made me really glad I hate heights so much.  Other that going out to encourage everyone and check on progress, I got to stay inside because there was no way I was getting on that roof.

Anyway, everything is weathered in and my floor has dried out and I'm so very thankful for all the help we had getting it done.

Yuck!  What a miserable day this was.  The floor got swept about 5 times and each time there was a good 1/2 inch of water on it.


Roofing day was better...only intermittent rain and lots of helpers so it went really fast.  Thank you God!

I'm hoping that maybe I can be all moved in (or everything can be ready for me to move in) by Christmas.  I don't think it's gonna happen sooner than that.  I'm missing my books and my cutting and sewin table a LOT, so I will be a happy camper when it's finally finished.

Friday, September 3, 2010

New Guest Room--Phase 1

Well, the priming and painting is done, and the bed is set up so I will have a place for people to sleep this weekend.  Right now, the room is pretty boring because there's nothing on the walls and the quilt I want to make is still just pieces of fabric in the garage but the room is definitely on its way.

(Ignore the quilt on the bed--it really doesn't look that great with the wall color but I needed the warmth of another blanket.)

The color is prettier than the photo shows.  It's a light greenish yellow called Summer Resort.   I laid out the quilt fabrics I bought and I like the way they look--I really like the orange and lime green ones the best so I might change directions with the quilt and go with only those two colors.  Another idea is to go with aqua and green--there is a nice quilt at Target with those colors that I think would look good and then I wouldn't have to make a quilt...decisions, decisions.  Too many to make right now.  :)

Wish I didn't hate returning things so much because then I'd just go buy the quilt at Target and try it out in the room to see what I think.  I might do it anyway, since I have to go to Costco and get party food tomorrow.

Saturday, August 28, 2010

What a Difference a Day Makes

Wow, it's been a while since I posted anything.  It's been an insanely busy summer and I have to admit I've been too tired to do anything creative lately.  Hopefully I'll get inspired soon and can blog about what newest thing I'm making.  I did make a skirt for my daughter to wear to a wedding next weekend and boy did it make me miss my studio.  I haven't had to cut out a pattern on the dining room table for many, many years and I'd forgotten how hard it is on the back.  I'm getting antsy to have my studio back!
 Thankfully, DH has been making very steady progress.  Yesterday morning, it looked like this...


by late afternoon, I had a real subfloor that I could walk on...


Today I got walls...


All I can say is whoo hoo!!!!!!!

I was busy today too.  Since we're having a big party here in a week, I figured it was about time I tackled painting the "soon to be" guest bedroom.  When we first moved in 2 years ago, we painted it bright, bright lime green for one of my sons and, although I really love the color, it is a little too intense for a guest room so I'm having to repaint.  I've painted one coat in the closet so far and am headed up to start priming the walls now that the kids have taken everything out of the room.  


 I just hope I can find my painting mojo again--I usually like painting but I'm pretty much hating the whole process today. The best I can say is I'll be glad when it's done.  :)

Monday, August 9, 2010

What Do You Get When You Combine Goodwill Silverware, a DSLR, a Lightbox, and Photoshop? Magic...

I was looking at a home dec magazine the other day and fell in love with some black and white photos of silverware and I thought... hmmm... I have a light box now, I should see if I can take some shots like that.  So this afternoon, I got my light box and clamp lights out of the garage and set everything up on the dining room table and started clicking away. 

I had to do some tweaking in Photoshop to get the really high key look I wanted--I'm not sure I could do it all in camera or not.  I'll have to do some more reading and experimenting to see if I can get the look a little closer in camera than what I managed today.   I still have so much to learn...


 I can't belive how good this stuff looks in the photos compared to real life.  Ah the magic of product photography.  :)

Gotta say that shooting these photos was a lot of fun.  I can't wait to find some more cool silverware and utensils at the thrift store.  I might even print some of these and frame them.  :)

Sunday, August 8, 2010

Have I Ever Said I Love Blue?

Azure, cerulean, cobalt, peacock, turquoise, periwinkle, navy, teal, midnight...I love them all.  So, I've been trying to figure out how to add some more blue to the kitchen and to the living room.  I thought about a valance for over the kitchen window but I really don't like valances so I had to think of something else.  Ideally, I wanted to find some cool metal grates or registers that I could paint blue and hang up but I didn't have any luck finding any today when I went to Goodwill and the local junktique store.  But, I did score at Joann's.  I found these cheap coasters and buttons and put them together and voila...some new color for the kitchen.  

I think it looks pretty good although ideally, I'd still like to find some cool metal grates or something more industrial that I can paint blue and hang up.


Here are close ups of the coasters.

I also picked up some dye at Joann's and dyed my living room and dining room curtains.  I figured that I didn't have much to lose since they were originally cheap Walmart sheets that I bought when we first moved in.  The color is about the same as the edge of the coasters or maybe a shade lighter.  I don't hate them, but I don't love them either.  I'll give it a day or two (and some daylight) and then I can decide.

Maybe it will give me the little shove I need to go out and find some curtains/curtain fabric that I love, although the search for curtains (and bedding, and towels, and lots of other stuff) usually ends up being very frustrating since the colors I like are brighter than what the majority of people like...

Wednesday, July 21, 2010

Photo Fun With Light Boxes

Well, one good thing I can say about how unpredictable the sun has been this summer is that it's pushing me to try some new things with photography.  I love shooting landscapes but have always wanted to try doing some studio photography too--especially interesting product type photography.  But, studio equipment is freakin' expensive so I kind of dismissed ever being able to afford to do it.  Until I ran across a book at Barnes and Noble and a few websites online that talk about really cheap ways to make studio equipment.  Man, I love the internet!!!

Because I don't have studio space (and storage space) right now, I decided I should start with something fairly small.  So, I decided to try making a light box or light tent.  Basically it's a box or tent made with white fabric that is used to photograph close ups of small objects--think etsy and ebay photos.  I found some instructions online to make one out of a cardboard box.  Here's a link if you're interested in finding out more.   http://digital-photography-school.com/how-to-make-a-inexpensive-light-tent 

Anyway, I went to Lowes and bought a cardboard box, a few clamp-on work lights and scrounged around till I found some vellum and some masking tape and voila, I had a light box.

Here is the basic set up I used today.

I took all the camera photos in my last post using this set up and then tried some pictures of glass.  


I still have a ton to learn and I need to try a few different techniques in order to get the kind of photos of glass that I really want but all in all, it was a fun day of experimentation.  :)

Tuesday, July 20, 2010

Vintage Camera Find

...or Sometimes it's Really Nice That Your DH Loves Auctions.

Projectman went to the auction Saturday to check out a cement mixer and ended up bringing home 8 vintage cameras for me.  He called me mid-auction to tell me they had a few old Kodaks and asked if I'd like him to bid on one.  When he went over to get more info for me, he discovered a treasure--a Rolleiflex Twin Lens Reflex camera.  I've been wanting one since I first got into this new hobby of mine and so I was suitably
excited (read panting and drooling and crossing every finger and toe I have), hoping there wouldn't be anyone at the auction who knew their real value.  Anyway, being the wonderful man he is, he and DD stayed for a few extra hours at the auction, sitting through innumerable ugly crystal knick knacks, in order to bid on the Rolleiflex for me.  Instead, they auctioned all the cameras off as one lot and I ended up with quite an addition to my tiny vintage camera collection.  And I think I got some real beauties too.  :)

This blog post is obscenely bloated with photos because I have tried 3 times to make a collage in Picassa but the menu for that option seems to be disabled for some reason.  I guess that means y'all will just have to look at all of my lovely cameras individually.  Heh, heh, heh...

Kokak 3A Autographic Camera Model C circa 1913-1919

Kodak 1A Pocket Camera Series ii  circa 1926-1932
Even though it doesn't look like it from the photos, this camera is about half as big as the 3A


Brownie Hawkeye No. 2 Model C a British model circa 1907-1914


Brownie Reflex Synchro Model circa 1949-1952


Kodak Duaflex IV circa 1947-1960


Brownie 8mm Movie Camera circa 1951-1956


Kuribayashi Petri 2.8 Color Corrected Super 35mm Rangefinder circa 1958-1962


And the whole reason I have a bunch of new-to me vintage cameras.
Rolleiflex Twin Lens Reflex camera 2.8C Model K7C circa 1951-1953

I took the photos using the new DIY light box that I made yesterday out of a cardboard box, vellum, masking tape and poster board.  I just love it when I can make stuff for cheap!  :)  Next post will have a bit more about the light box and some of the things I've tried to shoot with it.